Monday, August 26, 2013

Cherry Mobile Cosmos Series Specs


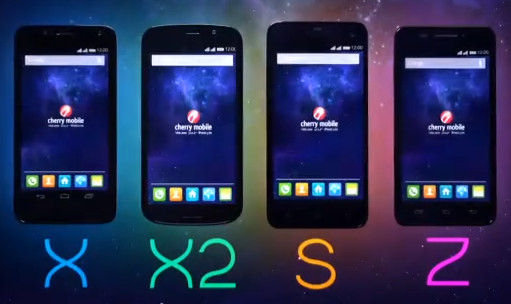
The Cosmos series - comprised of Cherry Mobile Cosmos S, X2, X, and Z - features quad core processors made by Taiwanese chipset maker MediaTek, 1GB of RAM, 18 MegaPixel main cameras, 5 to 8 MegaPixel front facing cams - great for selfies, and display sizes ranging from 4.7 to 5 inches.
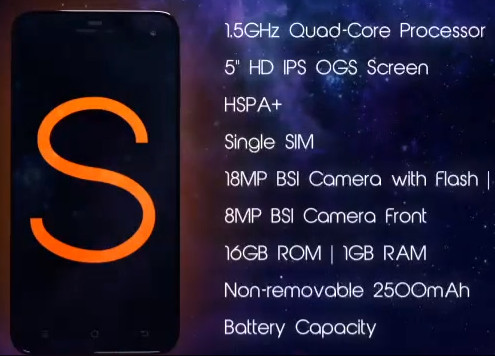


Single SIM Cherry Mobile Cosmos S runs Android Jelly Bean 4.2 operating system with 1.5 GHz MediaTek 6589T Quad Core processor and handles multitasking with 1 GB of RAM. The handset - with dimensions of 147 x 72.1 x 6.98 mm - comes replete with a 5-inch 5-point multi-touch HD-IPS OGS (One Glass Solution) display protected by scratch-resistant Asahi Dragon Trail Glass, 16GB of non-expandable internal storage, 18 MegaPixel main camera with Flash and BSI sensor, 8 MegaPixel front cam with BSI, and GPS. As for connectivity, Cosmos S supports 3G HSPA+, Wi-Fi, and Bluetooth. Of the four new phones, this one has the biggest battery pack at 2,500 mAh albeit it's non-removable. CM has yet to disclose the official SRP of this handset but according to our sources, it will sell for Php 10,999 upon launch.
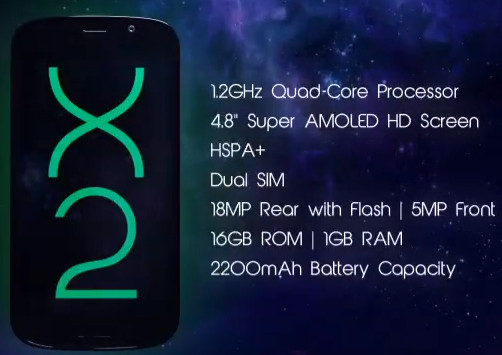


Cherry Mobile Cosmos X2, on the other hand, flaunts a 4.8-inch Samsung-made Super AMOLED HD display protected by scratch-resistant Gorilla Glass 2. This Dual SIM smartphone - with Smart Call and Smart Stay capabilities just like Samsung Galaxy S3 and S4 - features an 18 MegaPixel autofocus camera with BSI sensor and flash, 5 MegaPixel front cam with BSI sensor, 16 GB of internal storage expandable via microSD card slot, 2,200 mAh Li-Ion removable battery pack, GPS, and WiFi, Bluetooth, and 3G HSPA+ connectivity support. The handset runs Android 4.2 operating system with 1.2 GHz MediaTek MT 6589 Quad-Core Processor, handles multitasking with 1GB of RAM, and will don an SRP of Php 11,699.
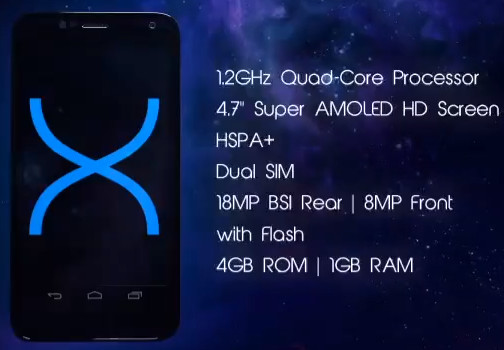


Priced at only Php 9,999, Dual SIM Cherry Mobile Cosmos X - with dimensions of 135 x 69.7 x 7.9 mm - is the most affordable member of the Cosmos family. The handset runs Android 4.2 Jelly Bean operating system with a 1.2 GHz Quad Core ARM Cortex A7 CPU and PowerVR SGX544MP GPU in MediaTek MT6589 chipset. Other technical specifications include a 4.7-inch Super AMOLED HD dislay underneath Gorilla Glass 2, 1 GB of RAM, 4 GB of internal storage expandable via microSD card slot, 18 MegaPixel autofocus camera with LED flash and BSI sensor, 8 MegaPixel

front-facing cam with BSI sensor, Full HD video recorder, FM Radio, WiFi, Bluetooth and 3G HSPA+ connectivity support, and removable 1,800 mAh Li-Ion battery pack.
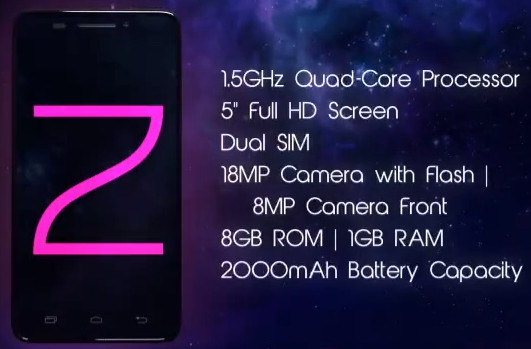


Php 11,999 Cherry Mobile Cosmos Z comes with key technical specifications including a 1.5 GHz MediaTek 6589T Quad-Core Processor running Android 4.2 Jelly Bean operating system, 1 GB of RAM, 5-inch Full HD IPS LCD with 441 ppi pixel density protected by Gorilla Glass 2, 18 MegaPixel autofocus camera with LED flash and BSI sensor, 8 MegaPixel front-facing cam, 1080p video recorder, FM Radio, and a removable 2,000 mAh Li-Ion battery pack. As for connectivity, the 142.7 x 71.9 x 7.8 mm smartphone supports WiFi, Bluetooth, and 3G HSPA+.


source : http://www.techpinas.com/2013/08/cherry-mobile-cosmos-s-and-x2-price.html

MyPhone Iceberg Full Specs


MyPhone Iceberg Complete Specs

1.2 GHz Quad Core MediaTek MT6589 Processor, Cortex-A7
Android 4.2.1 Jelly Bean
5.7 Inch High Definition IPS Display at 720 x 1280 Pixel Resolution or 258 Pixels per Inch
Corning Gorilla Glass 2 Scratch Resistant
12 Megapixel Autofocus Rear Camera with LED Flash and BSI
5 MegaPixel Autofocus Front Camera
PowerVR Series 5XT GPU
1 GB RAM
16 GB Internal Storage
No MicroSD Slot
WiFi, WiFi Hotspot
3G (HSPA+), EDGE, GPRS, GSM
Bluetooth and GPS
Wireless Display
USB OTG
FM Radio
Light, Motion, Proximity and Magnetic Sensors
2,600 mAh Li-ion Battery
₱11,988.00

MyPhone Iceberg Features :

Clever Motion - like Samsung's Air Gesture that lets you control MyPhone Iceberg by performing certain actions with your hands.You can wave to take a picture or make the screen of MyPhone Iceberg dimmer and even dial a phone number. Flipping the phone up side down will also mute it.

Wireless Display - MyPhone will sell a wireless HDMI adaptor for MyPhone Iceberg. The adaptor needs to be plugged into a TV with an HDMI port so that MyPhone Iceberg can connect with it.


Friday, August 23, 2013

How to Setup Amazon EC2 Instance and Install Virtalmin/Webmin part 2

This is the continuation of my tutorial on how to setup a amazon ec2 instance and Install Virtualmin/Webmin.

 http://techno-grub.blogspot.com/2013/06/how-to-setup-amazon-ec2-instance-and.html

As we go back to our previous tutorial.. we already done setting up the Amazon EC2 Instance and connecting it to our DNS to the IP that EC2 provide.. and also connecting it to our SSH client (for my example, im using Putty.

Ok now im going to explain the other part of my tutorial.. on how to install Virtualmin/Webmin to our EC2 server..


Since we already done connecting to our server.. the first thing you need to do is to update and upgrade your server.. to do this you need this following command..

      TO UPDATE :
            apt-get update
            or
            sudo apt-get update

      TO UPGRADE :
            apt-get upgrade
            or
            sudo apt-get upgrade

(updating and upgrading may prompt you to install something, just
allow it to install :D )

Then after that you need to change your timezone using this command..

      TO CHANGE TIMEZONE :
            dpkg-reconfigure tzdata

select your timezone ( for example "Asia/Manila")


After that we can now download the virtualmin.. to download virtualmin.. use this commands,

      wget http://software.virtualmin.com/gpl/scripts/install.sh

after downloading you can now install it.

      sudo /bin/sh/ install.sh

in order for you to run the webmin.. you need this following command

     service webmin start
     or
     sudo service webmin start

before you can access the virtualmin/webmin on your browser, you need first to open the port 10000 to your EC2 Security Group.. to do that you need to go back to your EC2 Management Console..

Under NETWORK & SECURITY > Security Groups

you can see there the list of security group your instance is belong.. example is "quicklaunch-0"
and for you to access it on your browser..

to add port just follow this image


https://YOUR_IP_HERE:10000

note : it needs to be https://


you will see this kind of warning message, but its ok just click "proceed anyway".

and you can now login..


but since we only have our user name "root" and we don't have password for it.. (base on the part 1 tutorial). then we are going to add password for root. just go back to your SSH client and this command

      passwd

and it will ask you to input your password.. after that you can now login to your Virtualmin/Webmin.


and thats all.. hope it helps hehehe :D