Friday, September 20, 2013

Cherry Mobile Flare 2.0 Full Specs


After the great success of its previous version.. here comes the new Cherry Mobile 2.0

Cherry Mobile Flare 2.0 Specs
  • 4″ WVGA IPS display (480 x 800 resolution, 233ppi)
  • 1.2GHz quad core Qualcomm MSM8225Q processor
  • Adreno 203 GPU
  • 512MB RAM
  • 4GB internal storage
  • 3G/HSPA
  • WiFi
  • Bluetooth
  • GPS with A-GPS
  • FM Radio
  • 3.5mm headset port
  • Micro USB port
  • Dual SIM functionality with dual standby support
  • Price: Php3,999


Read more: http://www.mobiletechpinoy.com/tech-news/cherry-mobile-flare-2-0-vs-flare-whats-changed-two/#ixzz2fSKL55Kh

Monday, August 26, 2013

Cherry Mobile Cosmos Series Specs


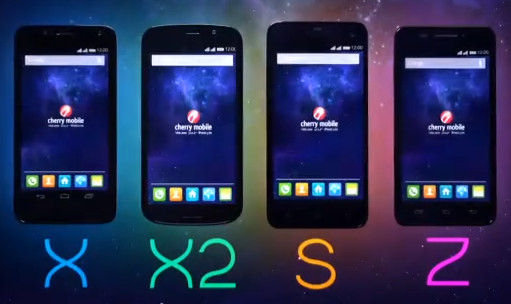
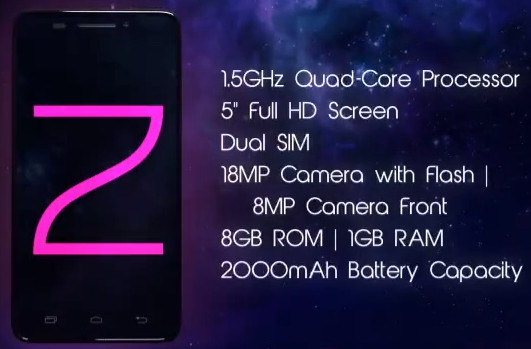
The Cosmos series - comprised of Cherry Mobile Cosmos S, X2, X, and Z - features quad core processors made by Taiwanese chipset maker MediaTek, 1GB of RAM, 18 MegaPixel main cameras, 5 to 8 MegaPixel front facing cams - great for selfies, and display sizes ranging from 4.7 to 5 inches.


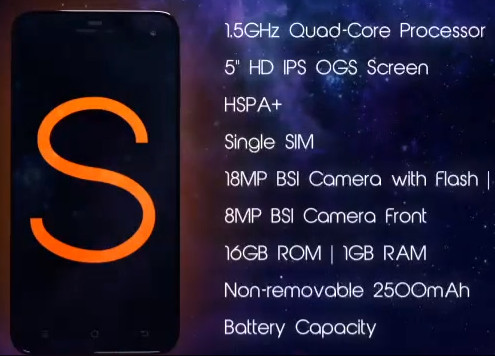
Single SIM Cherry Mobile Cosmos S runs Android Jelly Bean 4.2 operating system with 1.5 GHz MediaTek 6589T Quad Core processor and handles multitasking with 1 GB of RAM. The handset - with dimensions of 147 x 72.1 x 6.98 mm - comes replete with a 5-inch 5-point multi-touch HD-IPS OGS (One Glass Solution) display protected by scratch-resistant Asahi Dragon Trail Glass, 16GB of non-expandable internal storage, 18 MegaPixel main camera with Flash and BSI sensor, 8 MegaPixel front cam with BSI, and GPS. As for connectivity, Cosmos S supports 3G HSPA+, Wi-Fi, and Bluetooth. Of the four new phones, this one has the biggest battery pack at 2,500 mAh albeit it's non-removable. CM has yet to disclose the official SRP of this handset but according to our sources, it will sell for Php 10,999 upon launch.


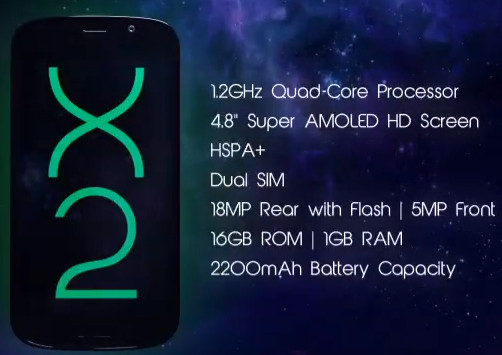
Cherry Mobile Cosmos X2, on the other hand, flaunts a 4.8-inch Samsung-made Super AMOLED HD display protected by scratch-resistant Gorilla Glass 2. This Dual SIM smartphone - with Smart Call and Smart Stay capabilities just like Samsung Galaxy S3 and S4 - features an 18 MegaPixel autofocus camera with BSI sensor and flash, 5 MegaPixel front cam with BSI sensor, 16 GB of internal storage expandable via microSD card slot, 2,200 mAh Li-Ion removable battery pack, GPS, and WiFi, Bluetooth, and 3G HSPA+ connectivity support. The handset runs Android 4.2 operating system with 1.2 GHz MediaTek MT 6589 Quad-Core Processor, handles multitasking with 1GB of RAM, and will don an SRP of Php 11,699.


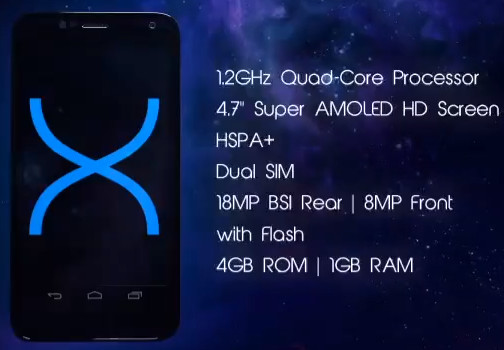
Priced at only Php 9,999, Dual SIM Cherry Mobile Cosmos X - with dimensions of 135 x 69.7 x 7.9 mm - is the most affordable member of the Cosmos family. The handset runs Android 4.2 Jelly Bean operating system with a 1.2 GHz Quad Core ARM Cortex A7 CPU and PowerVR SGX544MP GPU in MediaTek MT6589 chipset. Other technical specifications include a 4.7-inch Super AMOLED HD dislay underneath Gorilla Glass 2, 1 GB of RAM, 4 GB of internal storage expandable via microSD card slot, 18 MegaPixel autofocus camera with LED flash and BSI sensor, 8 MegaPixel

front-facing cam with BSI sensor, Full HD video recorder, FM Radio, WiFi, Bluetooth and 3G HSPA+ connectivity support, and removable 1,800 mAh Li-Ion battery pack.


Php 11,999 Cherry Mobile Cosmos Z comes with key technical specifications including a 1.5 GHz MediaTek 6589T Quad-Core Processor running Android 4.2 Jelly Bean operating system, 1 GB of RAM, 5-inch Full HD IPS LCD with 441 ppi pixel density protected by Gorilla Glass 2, 18 MegaPixel autofocus camera with LED flash and BSI sensor, 8 MegaPixel front-facing cam, 1080p video recorder, FM Radio, and a removable 2,000 mAh Li-Ion battery pack. As for connectivity, the 142.7 x 71.9 x 7.8 mm smartphone supports WiFi, Bluetooth, and 3G HSPA+.


source : http://www.techpinas.com/2013/08/cherry-mobile-cosmos-s-and-x2-price.html

MyPhone Iceberg Full Specs


MyPhone Iceberg Complete Specs

1.2 GHz Quad Core MediaTek MT6589 Processor, Cortex-A7
Android 4.2.1 Jelly Bean
5.7 Inch High Definition IPS Display at 720 x 1280 Pixel Resolution or 258 Pixels per Inch
Corning Gorilla Glass 2 Scratch Resistant
12 Megapixel Autofocus Rear Camera with LED Flash and BSI
5 MegaPixel Autofocus Front Camera
PowerVR Series 5XT GPU
1 GB RAM
16 GB Internal Storage
No MicroSD Slot
WiFi, WiFi Hotspot
3G (HSPA+), EDGE, GPRS, GSM
Bluetooth and GPS
Wireless Display
USB OTG
FM Radio
Light, Motion, Proximity and Magnetic Sensors
2,600 mAh Li-ion Battery
₱11,988.00

MyPhone Iceberg Features :

Clever Motion - like Samsung's Air Gesture that lets you control MyPhone Iceberg by performing certain actions with your hands.You can wave to take a picture or make the screen of MyPhone Iceberg dimmer and even dial a phone number. Flipping the phone up side down will also mute it.

Wireless Display - MyPhone will sell a wireless HDMI adaptor for MyPhone Iceberg. The adaptor needs to be plugged into a TV with an HDMI port so that MyPhone Iceberg can connect with it.


Friday, August 23, 2013

How to Setup Amazon EC2 Instance and Install Virtalmin/Webmin part 2

This is the continuation of my tutorial on how to setup a amazon ec2 instance and Install Virtualmin/Webmin.

 http://techno-grub.blogspot.com/2013/06/how-to-setup-amazon-ec2-instance-and.html

As we go back to our previous tutorial.. we already done setting up the Amazon EC2 Instance and connecting it to our DNS to the IP that EC2 provide.. and also connecting it to our SSH client (for my example, im using Putty.

Ok now im going to explain the other part of my tutorial.. on how to install Virtualmin/Webmin to our EC2 server..


Since we already done connecting to our server.. the first thing you need to do is to update and upgrade your server.. to do this you need this following command..

      TO UPDATE :
            apt-get update
            or
            sudo apt-get update

      TO UPGRADE :
            apt-get upgrade
            or
            sudo apt-get upgrade

(updating and upgrading may prompt you to install something, just
allow it to install :D )

Then after that you need to change your timezone using this command..

      TO CHANGE TIMEZONE :
            dpkg-reconfigure tzdata

select your timezone ( for example "Asia/Manila")


After that we can now download the virtualmin.. to download virtualmin.. use this commands,

      wget http://software.virtualmin.com/gpl/scripts/install.sh

after downloading you can now install it.

      sudo /bin/sh/ install.sh

in order for you to run the webmin.. you need this following command

     service webmin start
     or
     sudo service webmin start

before you can access the virtualmin/webmin on your browser, you need first to open the port 10000 to your EC2 Security Group.. to do that you need to go back to your EC2 Management Console..

Under NETWORK & SECURITY > Security Groups

you can see there the list of security group your instance is belong.. example is "quicklaunch-0"
and for you to access it on your browser..

to add port just follow this image


https://YOUR_IP_HERE:10000

note : it needs to be https://


you will see this kind of warning message, but its ok just click "proceed anyway".

and you can now login..


but since we only have our user name "root" and we don't have password for it.. (base on the part 1 tutorial). then we are going to add password for root. just go back to your SSH client and this command

      passwd

and it will ask you to input your password.. after that you can now login to your Virtualmin/Webmin.


and thats all.. hope it helps hehehe :D


Wednesday, June 12, 2013

Angry Birds GO!

Today, the Angry bird page just posted this photo. Something NEW is coming!..

Hmm.. Temple Run angry birds version?? 

Monday, June 10, 2013

Cherry Mobile Blaze 2.0 Specs

Today, Cherry Mobile Announced their newest Phablet.. Tha Cherry Mobile Blaze 2.0


Cherry Mobile Blaze 2.0 Specs
Price : P 9,499


Samsung Galaxy Mega is now Officially Available in Philippines

Yes its true Samsung Galaxy Mega is now available here in our country, it was officially introduced to the local market the day samsung philippines opened its First Expirience Store at the 2nd floor of SM Aura Premier.

Checkout the specification of both Samsung Galaxy Mega, the 6.3 inch and 5.8 inch


Samsung Galaxy Mega 6.3 inch Specs
Price : P 23,990


Samsung Galaxy Mega 5.8 inch Specs
Price : 18,990


Samsung Galaxy Mega 6.3 


iOS 7

Apple Just announced about their upcoming Updates for iphones, ipod touch and ipads..

iOS 7 introduces great new features like Control Center, AirDrop for iOS, and smarter multitasking. It also makes the things you do every day even easier, faster, and more enjoyable. And while many of the apps look different, the way you do things feels perfectly familiar. So from day one, you know how to use the world’s most advanced mobile OS.In its most advanced form.

check out this video to know more about the new features of this iOS 7

video source : http://www.youtube.com/watch?v=rT_OmTMwvZI

Cherry Mobile Omega HD 2.0 Review


Check out this awesome review of the great Cherry Mobile Omega HD 2.0

Credits : Rappler
Source : http://www.youtube.com/watch?v=sLc6t8_HBCQ

Sunday, June 9, 2013

Cherry Mobile Jelly Bean Updates

Jelly Bean update is now available for all Cherry mobile Users,

Visit here the list of the Cherry mobile service center

http://www.cherrymobile.com.ph/content/cherry-mobile-customer-solutions

Difference between Ice Cream Sandwich and Jelly Bean


Credits to : victoriatagg
Source : http://community.giffgaff.com/t5/Blog/Ice-Cream-Sandwich-VS-Jelly-Bean/ba-p/5582214


Before comparing Ice Cream Sandwich and Jelly Bean, it's worth clarifying that we're talking about versions of Google's mobile operating system here, not confectionaries.


Ice Cream Sandwich is Android 4.0, Jelly Bean is the latest version, Android 4.1.

Ice Cream Sandwich came on the scene towards the end of last year and it was a huge revamp from its predecessor Gingerbread, it had an entirely new style set and looked great.

Jelly Bean however is more of a refinement than a visual overhaul like ICS was.The core interface remains unchanged with five home screens, shortcuts and widgets. These can be added in the same way on ICS and Jelly Bean, however in Jelly Bean, the widgets are more intelligent, moving around to accommodate you, rather than sitting static once positioned.

The notifications bar has also been refined in Jelly Bean. This is a bar at the top of the screen on all Android phones which can be pulled down to display notifications like missed calls and email alerts. In Jelly Bean, an expanded view is available for these notifications whereas in Ice Cream Sandwich, there's just a small fixed view, showing less information.

Google has also tweaked the gallery slightly in Jelly Bean. Now, pinching all the way out of your pictures will take you to a scrolling marquee of your images, which is very easy to browse through.

The final key difference between the versions of Android is something altogether less tangible and it's called Project Butter. Project Butter ensures a 60 frame per second steady frame rate, translating to a much smoother user experience across the UI. It makes touch input feel instantly more responsive and it means Android now competes visually with iOS and Windows Phone.

So there you have it, the battle of the confectionaries is complete and you should feel informed as to how Android 4.0, Ice Cream Sandwich stacks up against Android 4.1, Jelly Bean.

Saturday, June 8, 2013

Globe's Blackberry Q10


Credits to JM Balicano of MobileTechPinoy
Source : http://www.mobiletechpinoy.com/tech-news/globe-blackberry-q10-goes-live-on-june-7/


If you thought the Blackberry Z10 took its sweet time coming here, the Q10 seems to have taken an even longer detour. To put things in perspective, both these devices were announced back in January. Well, here we are a full 6 months after and it looks like the Blackberry Q10 has finally arrived on our shores.

However, if you are a subscriber of any other telecom other than Globe, you’re going to have to wait another month. Why? Because Globe happens to have a 30 day exclusivity period! The Globe Blackberry Q10 is scheduled to become available in the country by June 7 through their postpaid plans, but interested subscribers can already start ordering the Q10 online.


Get it in white!

Interested in getting your hands on the Blackberry Q10? It can be yours for as low as Php1,499 monthly through Plan 999 with a monthly cash out of Php500 on a 24 month contract. What’s great is that you also get unlimited LTE surfing at up to 42Gb speeds with your monthly peso consumable that you can convert into call, text or surfing combos.

Of course, you don’t have to get locked into a standard 24 month contract if you don’t want to. Globe MySuperPlan also offers flexible contract periods from 6 to 30 months. And you also get the full flexibility of being able to mix and match the combo and booster services you want so you can get a plan that is tailored to you.

“Our postpaid leadership is once again brought to life with this partnership with BlackBerry as Globe gets first dibs on the latest BlackBerry smartphone that’s about to hit the Philippine market,” said Raul Macatangay, Head of Globe Postpaid. “Filipinos are huge BlackBerry users, and we’re excited to be the first to offer the BlackBerry Q10 under our best-ever MySuperPlan, which promises to bring the best BlackBerry smartphone experience ever as we take plan customization and personalization a notch higher, where subscribers get the ultimate flexibility in creating a postpaid plan that best fits their needs, lifestyle, and budget.”

Interested in getting the best QWERTY smartphone in the market? Head on over to the Globe Blackberry Q10 order site here.

Cherry Mobile Fusion Wind Full Specs

Recently Cherry Mobile announced on their Facebook page about their first 8-inch tablet named Cherry Mobile Fusion Wind. Fusion Wind also comes with a free Cherry Mobile MF1 and boast a 1.5GHz Dual-Core Processor, 1gb RAM, 4gb Internal Storage, 2 mega-pixel back camera + VGGA front camera, HDMI port and Runs in Android 4.1 Jelly Bean.

source :http://www.mobiletechpinoy.com/previews/cherry-mobile-fusion-wind-revealed-in-back-to-school-promo/


Cherry Mobile Fusion Wind Specifications
1.5GHz Dual-Core Rockchip RK3066 Processor, Cortex-A9
8-inch XGA (1024x768) IPS capacitive display
160ppi with 5-point multi-touch feature
Android 4.1.1 (Jelly Bean)
ARM Mali-400 MP GPU
1GB of RAM
4GB of internal storage
microSD card slot up to 32GB
2MP fixed-focus camera (NO LED flash)
VGA (0.3MP) front camera
1080P Full HD video playback
(NO Bluetooth and GPS support)
WiFi 802.11 b/g/n / WiFi Hotspot
USB-OTG (Support external 3G dongle)
MicroUSB 2.0 / HDMI port / 3.5mm audio jack
Accelerometer / Gravity Sensor
Li-Ion 4,000mAh battery
Usage time up to 4 hours
Standby time up 10 hours
200 x 150 x 10mm (dimension)
437g (weight)

Price: Php5,999 with FREE Cherry Mobile MF1
Availability/ Release Date: Now available nationwide!

Inside of the Box

Cherry Mobile Fusion Wind
Power adapter
USB OTG Cable
USB Cable
User Manual

How to ROOT Cherry Mobile Flare


This was Originally Created/Written by : Marvs
Source : http://www.infohiway.net/2013/01/tutorial-how-to-root-your-cherry-mobile.html

After tinkering with your Cherry Mobile Flare, sooner or later you'll be needing to root your phone for whatever reason. And whether this is your first time or nth time to this process, you wanna make sure that it will not make your phone unusable.


This tutorial in rooting your Cherry Mobile Flare is meant to make the steps as simple and easy as possible that's why I also included a video showing you how I rooted my own unit. As always, make sure that you follow steps carefully and don't rush.

DISCLAIMER: Rooting can brick your phone and will also void its warranty. DO IT AT YOUR OWN RISK. I'm not responsible for any possible damage that may happen to your device.


I basically used the same procedures from my previous article on How to Root MyPhone A919 Duo.

How to change boot animation of Cherry Mobile Flare
How To Change Boot Logo/Splash Image Of Your Android Phone

Before Rooting:

Download to your computer this Root Tools zip file that contains PdaNet for Windows XP/Vista/7 and Root with Restore by Bin4ry> DOWNLOAD HERE
Unzip the file after download
For Windows 7/8/Vista, after unzipping, right click RunMe then click on Properties > click the Compatibility tab > check Compatibility and set it to Windows XP SP3 > Ok
Enable USB debugging on your phone. Go to Settings > Developer Options > USB Debugging.
Don't connect your phone to the computer until you're told to do so. Rooting your Cherry Mobile Flare:

On your PC, double click on PdaNetZ350 and continue with the installation until you see a pop-up message like the one below.


Select Others then click OK.
A warning message will appear saying that "Windows can't verify the publisher of this driver software." Click on "Install this driver software anyway"


PdaNet will now ask you to connect your device to the computer. Connect your phone to your computer via USB cable. Don't enable any modes like USB storage, etc.
Let the driver installation complete then finish.
On your PC again, double click on RunMe.


A command prompt window will pop-up. Press 1 and hit the Enter.

NOTE: If you want to UNROOT your Cherry Mobile Flare, follow step 6 onward until you reach this point but instead of typing 1, type x then hit enter and follow the instructions after that.


On your phone, tap “Restore my data”, this will reboot your phone, wait for your phone to be fully ready.
On your computer, the command prompt will require you to press any key to continue.
That's it! You've successfully rooted your Cherry Mobile Flare. How to Root Cherry Mobile Video:


How to check if your phone is rooted:
Install this Root Checker App to your phone. Download Here
Run the app and tap on Check Now
It should show the status of the phone.


If you enjoyed this article and wish to receive more great articles from me then don't forget to subscribe to my regular Email Updates to receive Latest Articles in your Mailbox. You can share your thoughts and insights by using the comment form below.

Ragnarok 2 Siege (War of Emperium)

Hey Guyz Check out this awesome video of Ragnarok 2 WoE, I'm more fan of the Original Ragnarok (the 2D one) and not yet play this one.. but I think this is also quite addictive like the first one.. the concept is the same.. the guild must destroy the Emperium..

Here is the video credits to tangos :


Friday, June 7, 2013

How to Setup Amazon EC2 Instance and Install Virtalmin/Webmin part 1

Im going to share how I setup an EC2 instance in amazon server.. and after creating I also install virtual/webmin.. so here are the steps..

First you need to create an AMI instance in amazon EC2

1. Sign up here : http://aws.amazon.com/

2. Under Amazon Web Services Go to EC2 virtual servers in the cloud.

3. Under the EC2 Dashboard you will see a tab for INSTANCES(allcaps) and under it you will see Instances, click on that then on the Upper Right corner click Launch Instance, a box will popup 


4. Select the option button Quick Launch Wizard
  • Name Your Instance: (ex. Web_Production)  
  • Choose a Key Pair
    • Create New (name it anything you want, like me I name my keypair apache) then download (you need that keypair to connect to your server via SSH).
  • Choose a Launch Configuration :
    • Select  More Amazon Machine Images (if you select that there are thousands of AMI to choose) 
  • Continue
5. Search for "ami-6735f30e", it is a Debian Linux server running in 32 bit, it has a built-in virtualmin. select it and continue


6. the next popup click Launch.


Now that you successfully created an AMI Instance, Its time for you to Associate an IP and connect to your server via SSH

Associate IP

You need first to create an Elastic IP (this will become your website IP address, you will going to point your Domain in this IP, but later on we are going to discuss about that) , and to do that Go back to your amazon account

1. Under the EC2 Dashboard you will see a tab for NETWORK & SECURITY under it you will see Elastic IPs, click on that. then on the upper right corner click Allocate New Address, message will popup click Yes, Allocate

2. After you allocate new address, a new IP address will show right click on that IP and click Associate Select the Instance that you created then click Yes, Associate.

After that you can now start connecting to your server..


first you will need a SSH client, I am using Putty as my SSH client. now lets start to connect

Connecting you SSH client to your Server.

1. Open Putty
       Under Session :
           Host Name : (the IP you created earlier)
           Port : 22
2. Attach your Keypair -go to  Connection > SSH > Auth , browse for your keypair, then click Open

3. Black screen will popup.. (similar to cmd prompt of windows) , type root as username,

And there you have it you are now connected to your server.

For now im not going to finish this Tutorial because I have a lots for deadlines to work for.. im going to finish it later..

:)